Saturday, November 5, 2011

Making A Boutique Banner

I have been preparing for a Farmer's Market for a few months now. I wanted to make the whole set up very cute and professional. I wanted to make sure I stood out and that everyone knew who I was, therefore I needed a banner to display my boutique name. I could have just went to a print shop and had them make a banner than wouldn't have taken up too much time, but could have been expensive. Since I think of myself as crafty I figured why not make my own. It might not be top-notch, but inexpensive and handmade by me.


My shopping list:
  • Canvas ( I bought a yard at Walmart and didn't use all of it, it's all up to how big you want it) $2.97
  • Cotton Transfer Paper (x2) $5.49
  • Curtain Grommets (8 pc. set... I only used 4) $6.99
Round about total was $21. I had all the other supplies at home (sewing machine, printer, etc.)


First thing I did was cut the size I wanted leaving about 2 inches on each edge to fold over to sew together.


Then I just sewed the edges with my sewing machine. I'm not perfect on the sewing machine at all so it was not perfect straight stiches, but it turned out pretty good. Then I used Microsoft Word and picked out the letters, color, and size for my boutique name. Printed them out and ironed them on... simple as that!!

Now to hang it I figured adding grommets would be a great way to just string and hang from my canopy tent and really it's the easiest thing ever!!


First you mark the center position of grommets across top of your material (in my case my banner). Position template over center marks and trace slots.


Then you simply just cut out the hole. I wanted grommets in each corner of my banner.


Next step is to place the raised center of the grommet in the hole from the right side
 (the front of your banner). Then I just flipped it over to push the raised part through to the other side.


The final step is to take the other half the grommet and position it over the
 raised center and press down to secure.


WA LA... you're finished!!
 Then you can add embellishments around the edgest to 
add some more color and detail to your banner. That is whats on my agenda next for my banner. I literally finished it the night before the market!! :)


Quick and easy idea for your next craft show!! :)
Hope you like!!

-Sarah

Monday, October 24, 2011

The Greatest Hot Glue Gun Invention Ever

      Crafting in any sort to me is relaxing, fun, and the excitement of what the ending result will be. Unfortunately it's not always as painless as it seems, from needle pricks to the finger, glue gun burns on your hand, and stringy glue that seems to migrate everywhere!! As an artisan/crafter your always looking for ways to prevent this and I came across something that is great if you use a glue guns often. It can be found from the The Hot Glue Gun Helpers (http://www.etsy.com/shop/hotgluegunhelpers). It comes as a 7-piece craft tool set and I'm totally looking forward to getting one myself!!!!


  • Protects your work surface and fingers
  • Heat resistant and non-stick
  • Finger caps help press into glue drops with no burning
  • Also works with Mod Podge, acrylic paints, ink pads, shimmer mists, markers, gem glues & tacky glue
    
     Invented by craft industry veterans and HGTV's Creative Juice hosts, Cathie Filian and Steve Piacenza. After years of burns, they developed the tools to ease you woes and make working with hot glue easier.


   I am really siked that I found this item and really wanted to share with all of those who have not yet discovered this amazing tool set. I know I am tired of peeling glue off my table and leaving spots from the glue gun being so hot, so I know that mat will come in very handy. I am constantly burning the tips of my fingers from trying to press something down and hot glue come around the edges and burn me, so I know those little finger caps will be heaven sent!! Check out The Hot Glue Gun Helpers at Etsy.com and get your 7-piece set today!!

Wednesday, October 5, 2011

Taking on New Ideas

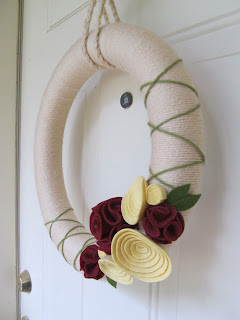
I have been creating hair bows and headbands for a little over a year now. Every once in awhile I come along something new and it inspires me to try it myself. Recently  I have become addicted to felt and with that I have created lovely felt flowers to attach to my headbands. I have also become a little addicted to yarn and with that yarn I have been creatly adorable yarn wreaths. Put both together and you have a masterpiece, or at least I think so. :)  Below is a few views from the first one I made!!!


I had so much fun doing this that I decided to take it on as a full time hobby. I am hoping that soon I can make more and add them to my etsy shop (http://www.simpleandsweet1.etsy.com/). I also would like to make a variety of felt headband and clippies and have even considered some cute felt flower napking rings. What do you think?? :)